Este tutorial pretende explicar en pocos minutos como desarrollar un hello world con Spring MVC (el framework de presentación de Spring).
Para entrar más en detalle, ver http://static.springsource.org/spring/docs/2.5.x/reference/mvc.html
Para entrar más en detalle, ver http://static.springsource.org/spring/docs/2.5.x/reference/mvc.html
Since Spring 2.5, an annotated controller style is available for Java 5+ users. This is a compelling alternative to implementing traditional Controller (sub-)classes, allowing for flexible multi-action handling.
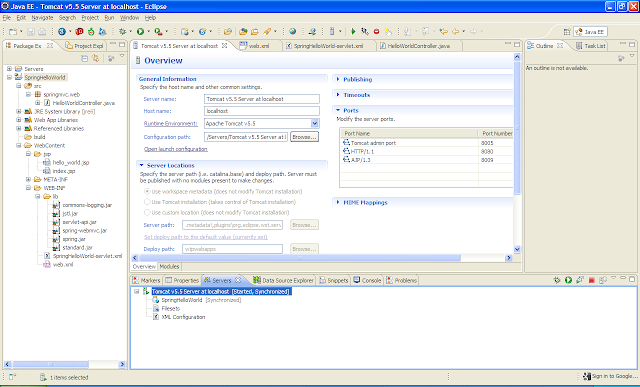
El resultado en el eclipse sera el siguiente:

1. Creamos un proyecto con el eclipse del tipo Dynamic Web Proyect
2. Descargar las librerias requeridas
Vamos a necesitar descargar un web server (tomcat) y las librerias de Spring con sus dependencias requeridas (deberán ser colocadas en el WEB-INF/lib):
- Tomcat v5.5
- Spring 2.5
- commons-logging.jar
- jstl.jar
- servlet-api.jar
- spring.jar
- spring-webmvc.jar
- standard.jar
3. Configuracion del server y los JARs descargados
Vamos a configurar el server en el eclipse (tomcat), creando un server y luego vamos a referenciar (mediante java build path) todas las librerías que copiamos en WEB/lib/


<?xml version="1.0" encoding="UTF-8"?>
<web-app id="WebApp_ID" version="2.4"
xmlns="http://java.sun.com/xml/ns/j2ee" xmlns:xsi="http://www.w3.org/2001/XMLSchema-instance"
xsi:schemaLocation="http://java.sun.com/xml/ns/j2ee http://java.sun.com/xml/ns/j2ee/web-app_2_4.xsd">
<servlet>
<servlet-name>SpringHelloWorld</servlet-name>
<servlet-class>org.springframework.web.servlet.DispatcherServlet</servlet-class>
<load-on-startup>1</load-on-startup>
</servlet>
<servlet-mapping>
<servlet-name>SpringHelloWorld</servlet-name>
<url-pattern>*.html</url-pattern>
</servlet-mapping>
<welcome-file-list>
<welcome-file>
jsp/index.jsp
</welcome-file>
</welcome-file-list>
</web-app>
Vemos como agregamos el DispatcherServlet que interceptara cualquier HTTP Request cuyo nombre termine en .html (segun lo definido en el web.xml). Luego el DispatcherServlet llamara al controlador (que lo definiremos mas abajo) para luego este terminar llamando a una JSP. Es decir, todo *.html sera mapeado con el controller correspondiente y este controller devolverá una JSP como resultado.
5. SpringHelloWorld-servlet.xml (Configuramos el Spring servlet)
<?xml version="1.0" encoding="UTF-8"?>
<beans xmlns="http://www.springframework.org/schema/beans" xmlns:xsi="http://www.w3.org/2001/XMLSchema-instance" xsi:schemaLocation="http://www.springframework.org/schema/beans http://www.springframework.org/schema/beans/spring-beans-2.5.xsd">
<bean name="/hello_world.html" class="springmvc.web.HelloWorldController"/>
<bean id="viewResolver" class="org.springframework.web.servlet.view.InternalResourceViewResolver">
<property name="viewClass" value="org.springframework.web.servlet.view.JstlView"/>
<property name="prefix" value="/jsp/"/>
<property name="suffix" value=".jsp"/>
</bean>
</beans>
<bean name="/hello_world.html"......
Aqui vemos como la URL /hello_world.html sera mapeada con el controller HelloWorldController
Ademas vemos que toda respuesta (del controller) estará bajo el directorio /jsp y sera xxx.jsp<bean id="viewResolver".....
Ideally we would like to map to the view using a logical name, allowing us to switch the view without having to change the controller. Para no tener que agregar en el controller, como vamos a ver en el siguiente punto, el nombre fisico de la vista (Ej return new ModelAndView("WEB-INF/jsp/hello.jsp", "now", now);).
For the basic mapping of a view to a location, simply set a prefix and a suffix on the InternalResourceViewResolver. This approach is the one that we will implement now, so we declare a 'viewResolver' entry. By choosing the JstlView, it will enable us to use JSTL in combination with message resource bundles as well as provide us with the support for internationalization.
5. Controller
package springmvc.web;
import java.io.IOException;
import javax.servlet.ServletException;
import javax.servlet.http.HttpServletRequest;
import javax.servlet.http.HttpServletResponse;
import org.springframework.web.servlet.ModelAndView;
import org.springframework.web.servlet.mvc.Controller;
public class HelloWorldController implements Controller {
public ModelAndView handleRequest(HttpServletRequest request,
HttpServletResponse response) throws ServletException, IOException {
String aMessage = "Hello World MVC!";
ModelAndView modelAndView = new ModelAndView("hello_world");
modelAndView.addObject("message", aMessage);
return modelAndView;
}
}
Este controllador terminara llamando a la vista hello_world que esta definida en el SpringHelloWorld-servlet.xml pasandole como parámetro un objeto "message" para luego poder recuperarlo desde la JSP.
6. hello_world.jsp
<%@ taglib prefix="c" uri="http://java.sun.com/jsp/jstl/core" %>
<html>
<body>
<p>This is my message: ${message}</p>
</body>
</html>
6. hello_world.jsp
We will be using the JSP Standard Tag Library (JSTL), so let's start by copying the JSTL files we need to our 'WEB-INF/lib' directory.
Copy jstl.jar from the 'spring-framework-2.5/lib/j2ee' directory and standard.jar from the 'spring-framework-2.5/lib/jakarta-taglibs' directory to the 'springapp/war/WEB-INF/lib' directory.
<html>
<body>
<p>This is my message: ${message}</p>
</body>
</html>

Resumen
Spring Web MVC allows you to use any object as a command or form object - there is no need to implement a framework-specific interface or base class
This is another major difference to Struts which is built around required base classes such as Action and ActionForm.
A Controller implementation can even write a view directly to the response (by returning null for the ModelAndView). In the normal case, a ModelAndView instance consists of a view name and a model Map, which contains bean names and corresponding objects (like a command or form, containing reference data). View name resolution is highly configurable, either via bean names, via a properties file, or via your own ViewResolver implementation. The fact that the model (the M in MVC) is based on the Map interface allows for the complete abstraction of the view technology.
The DispatcherServlet is an actual Servlet (it inherits from the HttpServlet base class), and as such is declared in the web.xml of your web application. Requests that you want the DispatcherServlet to handle will have to be mapped using a URL mapping in the same web.xml file
The framework will, on initialization of a DispatcherServlet, look for a file named [servlet-name]-servlet.xml in the WEB-INF directory of your web application and create the beans defined there
Ej web.xml
...
...
<web-app>
<servlet>
<servlet-name>example</servlet-name>
<servlet-class>org.springframework.web.servlet.DispatcherServlet</servlet-class>
<load-on-startup>1</load-on-startup>
</servlet>
<servlet-mapping>
<servlet-name>example</servlet-name>
<url-pattern>*.form</url-pattern>
</servlet-mapping>
</web-app>
...
...
In this example, all requests ending with .form will be handled by the 'example' DispatcherServlet. This is only the first step in setting up Spring Web MVC... the various beans used by the Spring Web MVC framework (over and above the DispatcherServlet itself) now need to be configured.
With the above servlet configuration in web.xml, you will need to have a file called '/WEB-INF/example-servlet.xml' in your application; this file will contain all of your Spring Web MVC-specific components (beans).
The Spring DispatcherServlet has a couple of special beans it uses in order to be able to process requests and render the appropriate views.
Controllers: Controllers are the components that form the 'C' part of the MVC.
Handler mappings: Handler mappings handle the execution of a list of pre- and post-processors and controllers that will be executed if they match certain criteria
View resolvers: View resolvers are components capable of resolving view names to views
Locale resolver: A locale resolver is a component capable of resolving the locale a client is using, in order to be able to offer internationalized views
y luego tenemos Theme resolver, multipart file resolver y Handler exception resolver(s)
Descargar ejemplo completo
Para descargarlo haga clic aqui
Bibliografia
http://maestric.com/doc/java/spring
http://sourceforge.net/projects/springframework/files/springframework-2/2.5/
http://static.springsource.org/spring/docs/2.5.x/reference/mvc.html
http://static.springsource.org/docs/Spring-MVC-step-by-step/
http://static.springsource.org/spring/docs/2.5.x/reference/mvc.html
Ctrl + C, Ctrl + V
ResponderEliminarBuena dami, me sirve, justo estoy con mvc :p
Me alegro q te sirva, cualquier cosa que no se entienda no dudes en contactarme...
ResponderEliminar