Este tutorial pretende explicar el funcionamiento del IoC Container de Spring y el uso de los beans.
Temas a tratar
- BeanFactory/ApplicationContext
- Instantiating beans
- Via constructor
- Via static factory
- Inyecting dependencies
- Via constuctor
- Via setterm methods
Scope beans
- Idref element
- References to others beans
- Depends-on element
- Lazy instantiated beans
- Scope beans
- Singleton
- Prototype
- Singleton beans with prototype-bean dependencies
- Others scopes
BeanFactory/ApplicationContext
Two of the most fundamental and important packages in Spring are the org.springframework.beans and org.springframework.context packages. Code in these packages provides the basis for Spring's Inversion of Control (alternately called Dependency Injection) features
The BeanFactory is the actual IoC container which instantiates, configures, and manages a number of beans.
A BeanFactory is represented by the interface org.springframework.beans.factory.BeanFactory, for which there are multiple implementations.
The most commonly used simple BeanFactory implementation is org.springframework.beans.factory.xml.XmlBeanFactory (XML-based configuration)
Ej.
Resource res = new FileSystemResource("beans.xml");
BeanFactory factory = new XmlBeanFactory(res);
O bien..
ApplicationContext context = new ClassPathXmlApplicationContext(
new String[] {"beans.xml", "daos.xml"});
// an ApplicationContext is also a BeanFactory (via inheritance)
BeanFactory factory = context;
Muchas veces hablar del BeanFactory y del ApplicationContext es lo mismo.
The default behavior for ApplicationContext implementations is to eagerly pre-instantiate all singleton beans at startup. Pre-instantiation means that an ApplicationContext will eagerly create and configure all of its singleton beans as part of its initialization process.
Beans
Bean definitions inside a XmlBeanFactory) are represented as BeanDefinition object
Every bean has one or more ids (also called identifiers, or names; these terms refer to the same thing). These ids must be unique within the container the bean is hosted in. A bean will almost always have only one id, but if a bean has more than one id, the extra ones can essentially be considered aliases.
When using XML-based configuration metadata, you use the 'id' or 'name' attributes to specify the bean identifier(s)
Instantiating beans
If you are using XML-based configuration metadata, you can specify the type (or class) of object that is to be instantiated using the 'class' attribute of the <bean/> element
1. Instantiation using a constructor (sin argumentos)
Depending on what type of IoC you are going to use for that specific bean, you may need a default (empty) constructor.
En caso que la clase BrandManager no tenga un constructor sin argumentos.
Ej.
....
....
<bean id="brandManager" class="springmvc.manager.BrandManager"/>
....
....
public class BrandManager {
private String a;
public BrandManager(String a) {
super();
this.a = a;
}
A la hora de inicializar el framework (startup de la aplicacion) vamos a tener el siguiente error:
org.springframework.beans.factory.BeanCreationException: Error creating bean with name 'brandManager' defined in ServletContext resource [/WEB-INF/SpringHelloWorld-servlet.xml]: Instantiation of bean failed; nested exception is org.springframework.beans.BeanInstantiationException: Could not instantiate bean class [springmvc.manager.BrandManager]: No default constructor found; nested exception is java.lang.NoSuchMethodException: springmvc.manager.BrandManager.<init>()
at org.springframework.beans.factory.support.AbstractAutowireCapableBeanFactory.instantiateBean(AbstractAutowireCapableBeanFactory.java:881)
at org.springframework.beans.factory.support.AbstractAutowireCapableBeanFactory.createBeanInstance(AbstractAutowireCapableBeanFactory.java:837)
at org.springframework.beans.factory.support.AbstractAutowireCapableBeanFactory.doCreateBean(AbstractAutowireCapableBeanFactory.java:440)
at org.springframework.beans.factory.support.AbstractAutowireCapableBeanFactory$1.run(AbstractAutowireCapableBeanFactory.java:409)
at java.security.AccessController.doPrivileged(Native Method)
....
....
Ahora bien, en caso que creamos un constructor publico sin argumentos
Ej.
public class BrandManager {
public BrandManager(String a) {
System.out.println("BrandManager construct...");
}
....
....
}
A la hora de inicializar el framework (startup de la aplicacion) en la traza, vamos a encontrar lo siguiente:
....
....
Aug 26, 2011 9:54:26 AM org.springframework.beans.factory.support.DefaultListableBeanFactory preInstantiateSingletons
INFO: Pre-instantiating singletons in org.springframework.beans.factory.support.DefaultListableBeanFactory@12884e0: defining beans [brandManager,carManager,/hello_world.html,/car_list.html,/new_car.html,viewResolver]; root of factory hierarchy
BrandManager construct...
Aug 26, 2011 9:54:26 AM org.springframework.web.servlet.FrameworkServlet initServletBean
....
....
2. Instantiation using a static factory method
When defining a bean which is to be created using a static factory method, along with the class attribute which specifies the class containing the static factory method, another attribute named factory-method is needed to specify the name of the factory method itself.
Ej.
....
....
<bean id="productManager" class="springmvc.manager.ProductManager"
factory-method="createInstance"/>
....
....
public class ProductManager {
public static ProductManager createInstance(){
System.out.println("ProductManager -> createInstance...");
return new ProductManager();
}
...
...
}
Importante: Tiene que ser static y tiene que retornar algo el metodo sino no funciona.
Injecting dependencies
1. Constructor Injection
Constructor argument resolution matching occurs using the argument's type. If there is no potential for ambiguity in the constructor arguments of a bean definition, then the order in which the constructor arguments are defined in a bean definition is the order in which those arguments will be supplied to the appropriate constructor when it is being instantiated
Ej.
...
...
<bean id="itemManager" class="springmvc.manager.ItemManager">
<constructor-arg>
<bean class="springmvc.manager.ProductManager"/>
</constructor-arg>
</bean>
...
...
public class ItemManager {
private ProductManager productManager;
public ItemManager(ProductManager productManager) {
System.out.println("ItemManager -> Constructor..");
this.productManager = productManager;
productManager.showProduct();
}
...
...
}
Ahora mostraremos otro ejemplo cuando los tipos de datos son tipos de datos simples
Ej.
...
...
<bean id="categoryManager" class="springmvc.manager.CategoryManager">
<constructor-arg type="int" value="1098"/>
<constructor-arg type="java.lang.String" value="Hola Mundo"/>
</bean>
...
...
o lo que seria lo mismo pero con indices en lugar de tipos
<bean id="categoryManager" class="springmvc.manager.CategoryManager">
<constructor-arg index="0" value="1098"/>
<constructor-arg index="1" value="Hola Mundo"/>
</bean>
public class CategoryManager {
private int count;
private String name;
public CategoryManager(int count, String name) {
System.out.println("CategoryManager --> Contruct...");
System.out.println("Count " + count);
System.out.println("Name " + name);
this.count = count;
this.name = name;
}
...
...
}
2. Setter Injection
Setter-based DI is realized by calling setter methods on your beans after invoking a no-argument constructor or no-argument static factory method to instantiate your bean.
Ej.
...
...
<bean name="/car_list.html" class="springmvc.web.CarListController">
<property name="cm" ref="carManager"/>
</bean>
...
...
public class CarListController implements Controller {
// IoC
private CarManager cm;
public CarManager getCm() {
return cm;
}
public void setCm(CarManager cm) {
this.cm = cm;
}
...
...
}
The idref element
Ambos ejemplos son lo mismo:
Ej 1
....
....
<bean id="theTargetBean" class="..."/>
<bean id="theClientBean" class="...">
<property name="targetName">
<idref bean="theTargetBean" />
</property>
</bean>
....
....
Ej 2
....
....
<bean id="theTargetBean" class="..." />
<bean id="theClientBean" class="...">
<property name="targetName" value="theTargetBean" />
</bean>
....
....
The main reason the first form is preferable to the second is that using the idref tag allows the container to validate at deployment time
that the referenced, named bean actually exists. In the second variation, no validation is performed on the value that is passed to the
'targetName' property of the 'theTargetBean' bean
References to other beans (collaborators)
The ref element is the final element allowed inside a <constructor-arg/> or <property/> definition element. It is used to set the value of the specified property to be a reference to another bean managed by the container (a collaborator)
Specifying the target bean by using the bean attribute of the <ref/> tag is the most general form, and will allow creating a reference to any bean in the same container (whether or not in the same XML file)
Ej 1.
<ref bean="someBean"/>
Ej 2.
....
....
<bean name="/car_list.html" class="springmvc.web.CarListController">
<property name="cm">
<ref bean="carManager"/>
</property>
</bean>
....
....
o bien, lo siguiente es lo mismo
....
....
<bean name="/car_list.html" class="springmvc.web.CarListController">
<property name="cm" ref="carManager"/>
</bean>
....
....
Specifying the target bean by using the local attribute leverages the ability of the XML parser to validate XML id references within the same file.
The XML parser will issue an error if no matching element is found in the same file
Ej 3.
<ref local="someBean"/>
Using depends-on
For most situations, the fact that a bean is a dependency of another is expressed by the fact that one bean is set as a property of another. This is typically accomplished with the <ref/> element in XML-based configuration metadata. For the relatively infrequent situations where dependencies between beans are less direct (for example, when a static initializer in a class needs to be triggered, such as database driver registration), the 'depends-on' attribute may be used to explicitly force one or more beans to be initialized before the bean using this element is initialized. Find below an example of using the 'depends-on' attribute to express a dependency on a single bean.
Ej.
....
....
<bean id="beanOne" class="ExampleBean" depends-on="manager"/>
<bean id="manager" class="ManagerBean" />
....
....
Lazily-instantiated beans
The default behavior for ApplicationContext implementations is to eagerly pre-instantiate all singleton beans at startup. Pre-instantiation means that an ApplicationContext will eagerly create and configure all of its singleton beans as part of its initialization process. Generally this is a good thing, because it means that any errors in the configuration or in the surrounding environment will be discovered immediately.
However, there are times when this behavior is not what is wanted. If you do not want a singleton bean to be pre-instantiated when using an ApplicationContext, you can selectively control this by marking a bean definition as lazy-initialized. A lazily-initialized bean indicates to the IoC container whether or not a bean instance should be created at startup or when it is first requested
Ej 1
...
...
<bean id="carManager" class="springmvc.manager.CarManager" lazy-init="true"/>
...
...
...
...
<bean name="/car_list.html" class="springmvc.web.CarListController">
<!-- IoC CarManager -->
<property name="cm" ref="carManager"/>
</bean>
...
...
En este caso, por mas que el bean carManager tenga el lazy-init en true, este bean se va a pre inicializar de todas maneras ya que tiene que ser inyectado por el container en el CarListController
Ahora bien, veamos otro ejemplo
Ej 2
...
...
<bean id="carManager" class="springmvc.manager.CarManager" lazy-init="true"/>
...
...
Si ahora nadie usa como dependencia al bean carManager, este no sera pre inicializado hasta la hora de usarlo.
Scope beans
Beans can be defined to be deployed in one of a number of scopes: out of the box, the Spring Framework supports exactly five scopes (of which three are available only if you are using a web-aware ApplicationContext).
The scopes supported out of the box are listed below:
1. singleton: Scopes a single bean definition to a single object instance per Spring IoC container. When a bean is a singleton, only one shared instance of the bean will be managed, and all requests for beans with an id or ids matching that bean definition will result in that one specific bean instance being returned by the Spring container
Ej
<bean id="accountService" class="com.foo.DefaultAccountService"/>
<!-- the following is equivalent, though redundant (singleton scope is the default); using spring-beans-2.0.dtd -->
<bean id="accountService" class="com.foo.DefaultAccountService" scope="singleton"/>
<!-- the following is equivalent and preserved for backward compatibility in spring-beans.dtd -->
<bean id="accountService" class="com.foo.DefaultAccountService" singleton="true"/>
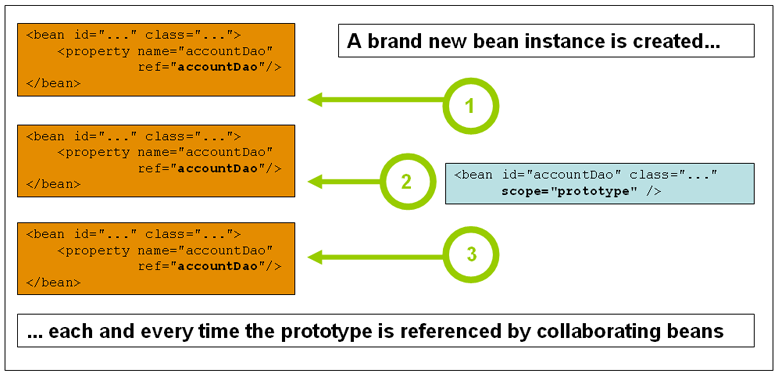
2. prototype: Scopes a single bean definition to any number of object instances. The non-singleton, prototype scope of bean deployment results in the creation of a new bean instance every time a request for that specific bean is made
Ej.
<!-- using spring-beans-2.0.dtd -->
<bean id="accountService" class="com.foo.DefaultAccountService" scope="prototype"/>
<!-- the following is equivalent and preserved for backward compatibility in spring-beans.dtd -->
<bean id="accountService" class="com.foo.DefaultAccountService" singleton="false"/>
Singleton beans with prototype-bean dependencies
When using singleton-scoped beans that have dependencies on beans that are scoped as prototypes, please be aware that dependencies are resolved at instantiation time. This means that if you dependency inject a prototype-scoped bean into a singleton-scoped bean, a brand new prototype bean will be instantiated and then dependency injected into the singleton bean... but that is all. That exact same prototype instance will be the sole instance that is ever supplied to the singleton-scoped bean, which is fine if that is what you want.
However, sometimes what you actually want is for the singleton-scoped bean to be able to acquire a brand new instance of the prototype-scoped bean again and again and again at runtime. In that case it is no use just dependency injecting a prototype-scoped bean into your singleton bean, because as explained above, that only happens once when the Spring container is instantiating the singleton bean and resolving and injecting its dependencies.
The other scopes, namely request, session, and global session are for use only in web-based applications:
3. request: Scopes a single bean definition to the lifecycle of a single HTTP request; that is each and every HTTP request will have its own instance of a bean created off the back of a single bean definition. Only valid in the context of a web-aware Spring ApplicationContext.
4. session: Scopes a single bean definition to the lifecycle of a HTTP Session. Only valid in the context of a web-aware Spring ApplicationContext.
5. global session: Scopes a single bean definition to the lifecycle of a global HTTP Session. Typically only valid when used in a portlet context. Only valid in the context of a web-aware Spring ApplicationContext.
Bibliografia
http://static.springsource.org/spring/docs/2.5.x/reference/beans.html