http://www.javacodegeeks.com/2010/05/gwt-2-spring-3-jpa-2-hibernate-35.html
http://www.springbyexample.org/examples/simple-gwt-spring-webapp-spring-js-config.html
Haga clic aqui para descargar una versión del proyecto donde encontraremos Maven + GWT + Spring + hibernate (con @PersistenceContext de JPA sin usar el JPADaoSupport de Spring):
También lo podremos encontrar en google code:
Nota: La diferencia es que este es un proyecto que esta en continuo desarrollo, por lo que seguramente si se hacen un checkout no sera la version preliminar que encontraremos si la descargamos aqui
Algunos tips de Spring que debemos entender para poder armar un servicio o un DAO:
- if you are going to use JpaDaoSupport, use the JpaTemplate methods.
- if you want to use EntityManager directly, then inject it via @PersistenceContext, and don't useJpaDaoSupport


Configuración mas eficiente de Spring + JPA + Hibernate:
http://www.javacodegeeks.com/2010/05/jboss-42x-spring-3-jpa-hibernate.html
Gwt + Maven - Alternativas para generar un proyecto esqueleto
http://www.uptick.com.au/content/getting-started-gwt-maven-and-eclipse
http://cirovladimir.wordpress.com/2011/08/20/eclipse-indigo-gwt-maven/
Alternativa 1 para generar un proyecto esqueleto con GWT y Maven :
Generar un proyecto esqueleto usando gwt-maven-plugin archetype:
- Right-click in the Project Explorer and choose "New -> Project...":
- Then choose "Maven -> Maven Project" and click the "Next" button
- Choose a Workspace for the new Maven project and then click the "Next" button
- Select the "gwt-maven-plugin" archetype from org.codehaus.mojo and and then click the "Next" button
- Enter the details (known as the Maven coordinates) for the new project and then click the "Finish" button.
- Unfortunately, there are some issues with the project skeleton that is generated
Alternativa 2 para generar un proyecto esqueleto con GWT y Maven :
-DarchetypeRepository=https://nexus.codehaus.org/content/groups/snapshots-group/
-DarchetypeGroupId=org.codehaus.mojo
-DarchetypeArtifactId=gwt-maven-plugin
-DarchetypeVersion=2.1.1-SNAPSHOT
-DgroupId=au.com.uptick
-DartifactId=MyGwtMavenSampleApp
-Dversion=0.0.1-SNAPSHOT
-Dpackage=au.com.uptick.gwt.maven.sample
-Dmodule=MyGwtMavenSampleApp
<!-- GWT Maven Plugin-->
<plugin>
<groupId>org.codehaus.mojo</groupId>
<artifactId>gwt-maven-plugin</artifactId>
<!-- JS is only needed in the package phase, this speeds up testing -->
<executions>
<execution>
<phase>prepare-package</phase>
<goals>
<goal>compile</goal>
</goals>
</execution>
</executions>
<!-- Plugin configuration. There are many available options,
see gwt-maven-plugin documentation at codehaus.org -->
<configuration>
<!-- URL that should be automatically opened in the GWT shell (gwt:run). -->
<runTarget>MyGwtMavenSampleApp.html</runTarget>
<!-- Location of the develop-mode web application structure (gwt:run). -->
<hostedWebapp>target/www</hostedWebapp>
<!-- Ask GWT to create the Story of Your Compile (SOYC) (gwt:compile) -->
<soyc>true</soyc>
</configuration>
</plugin>
ATENCION:
<!-- GWT Maven Plugin-->
<plugin>
<groupId>org.codehaus.mojo</groupId>
<artifactId>gwt-maven-plugin</artifactId>
<dependencies>
<dependency>
<groupId>com.google.gwt</groupId>
<artifactId>gwt-user</artifactId>
<version>${gwtVersion}</version>
</dependency>
<dependency>
<groupId>com.google.gwt</groupId>
<artifactId>gwt-dev</artifactId>
<version>${gwtVersion}</version>
</dependency>
</dependencies>
<!-- JS is only needed in the package phase, this speeds up testing -->
<executions>
<execution>
<phase>prepare-package</phase>
<goals>
<goal>compile</goal>
</goals>
</execution>
</executions>
<!-- Plugin configuration. There are many available options,
see gwt-maven-plugin documentation at codehaus.org -->
<configuration>
<!-- URL that should be automatically opened in the GWT shell (gwt:run). -->
<runTarget>MyGwtMavenSampleApp.html</runTarget>
<!-- Location of the develop-mode web application structure (gwt:run). -->
<hostedWebapp>target/www</hostedWebapp>
<!-- Ask GWT to create the Story of Your Compile (SOYC) (gwt:compile) -->
<soyc>true</soyc>
</configuration>
</plugin>
Continuamos con el ejemplo descargado, vamos a compilarlo, generar el WAR y configurarlo en el Eclipse
EL POM, modificado con integración entre GWT, Spring, JPA y Hibernate seria el siguiente (es lo mismo que el descargado previamente):
<?xml version="1.0" encoding="UTF-8"?>
<project xmlns="http://maven.apache.org/POM/4.0.0" xmlns:xsi="http://www.w3.org/2001/XMLSchema-instance"
xsi:schemaLocation="http://maven.apache.org/POM/4.0.0 http://maven.apache.org/maven-v4_0_0.xsd">
<!-- POM file generated with GWT webAppCreator -->
<modelVersion>4.0.0</modelVersion>
<groupId>au.com.uptick.gwt.maven.sample</groupId>
<artifactId>MyGwtMavenSampleApp</artifactId>
<packaging>war</packaging>
<version>1.0-SNAPSHOT</version>
<name>au.com.uptick.gwt.maven.sample.MyGwtMavenSampleApp</name>
<!--
*************************************************
LEER:
*************************************************
http://mojo.codehaus.org/gwt-maven-plugin/eclipse/google_plugin.html
http://mojo.codehaus.org/gwt-maven-plugin/user-guide/project.html
*************************************************
mvn clean
mvn eclipse:clean
mvn gwt:eclipse
mvn compile gwt:compile
mvn package
mvn install
-->
<properties>
<!-- Convenience property to set the GWT version -->
<gwtVersion>2.1.1</gwtVersion>
<org.springframework.version>3.0.5.RELEASE</org.springframework.version>
<!-- GWT needs at least java 1.5 -->
<maven.compiler.source>1.5</maven.compiler.source>
<maven.compiler.target>1.5</maven.compiler.target>
</properties>
<dependencies>
<dependency>
<groupId>com.google.gwt</groupId>
<artifactId>gwt-servlet</artifactId>
<version>${gwtVersion}</version>
<scope>runtime</scope>
</dependency>
<dependency>
<groupId>com.google.gwt</groupId>
<artifactId>gwt-user</artifactId>
<version>${gwtVersion}</version>
<scope>provided</scope>
</dependency>
<dependency>
<groupId>com.google.gwt</groupId>
<artifactId>gwt-dev</artifactId>
<version>${gwtVersion}</version>
<scope>test</scope>
</dependency>
<dependency>
<groupId>junit</groupId>
<artifactId>junit</artifactId>
<version>4.4</version>
<scope>test</scope>
</dependency>
<!--
Core utilities used by other modules.
Define this if you use Spring Utility APIs (org.springframework.core.*/org.springframework.util.*)
-->
<dependency>
<groupId>org.springframework</groupId>
<artifactId>spring-core</artifactId>
<version>${org.springframework.version}</version>
</dependency>
<!--
Expression Language (depends on spring-core)
Define this if you use Spring Expression APIs (org.springframework.expression.*)
-->
<dependency>
<groupId>org.springframework</groupId>
<artifactId>spring-expression</artifactId>
<version>${org.springframework.version}</version>
</dependency>
<!--
Bean Factory and JavaBeans utilities (depends on spring-core)
Define this if you use Spring Bean APIs (org.springframework.beans.*)
-->
<dependency>
<groupId>org.springframework</groupId>
<artifactId>spring-beans</artifactId>
<version>${org.springframework.version}</version>
</dependency>
<!--
Aspect Oriented Programming (AOP) Framework (depends on spring-core, spring-beans)
Define this if you use Spring AOP APIs (org.springframework.aop.*)
-->
<dependency>
<groupId>org.springframework</groupId>
<artifactId>spring-aop</artifactId>
<version>${org.springframework.version}</version>
</dependency>
<!--
Application Context (depends on spring-core, spring-expression, spring-aop, spring-beans)
This is the central artifact for Spring's Dependency Injection Container and is generally always defined
-->
<dependency>
<groupId>org.springframework</groupId>
<artifactId>spring-context</artifactId>
<version>${org.springframework.version}</version>
</dependency>
<!--
Various Application Context utilities, including EhCache, JavaMail, Quartz, and Freemarker integration
Define this if you need any of these integrations
-->
<dependency>
<groupId>org.springframework</groupId>
<artifactId>spring-context-support</artifactId>
<version>${org.springframework.version}</version>
</dependency>
<!--
Transaction Management Abstraction (depends on spring-core, spring-beans, spring-aop, spring-context)
Define this if you use Spring Transactions or DAO Exception Hierarchy
(org.springframework.transaction.*/org.springframework.dao.*)
-->
<dependency>
<groupId>org.springframework</groupId>
<artifactId>spring-tx</artifactId>
<version>${org.springframework.version}</version>
</dependency>
<!--
JDBC Data Access Library (depends on spring-core, spring-beans, spring-context, spring-tx)
Define this if you use Spring's JdbcTemplate API (org.springframework.jdbc.*)
-->
<dependency>
<groupId>org.springframework</groupId>
<artifactId>spring-jdbc</artifactId>
<version>${org.springframework.version}</version>
</dependency>
<!--
Object-to-Relation-Mapping (ORM) integration with Hibernate, JPA, and iBatis.
(depends on spring-core, spring-beans, spring-context, spring-tx)
Define this if you need ORM (org.springframework.orm.*)
-->
<dependency>
<groupId>org.springframework</groupId>
<artifactId>spring-orm</artifactId>
<version>${org.springframework.version}</version>
</dependency>
<!--
Object-to-XML Mapping (OXM) abstraction and integration with JAXB, JiBX, Castor, XStream, and XML Beans.
(depends on spring-core, spring-beans, spring-context)
Define this if you need OXM (org.springframework.oxm.*)
-->
<dependency>
<groupId>org.springframework</groupId>
<artifactId>spring-oxm</artifactId>
<version>${org.springframework.version}</version>
</dependency>
<!--
Web application development utilities applicable to both Servlet and Portlet Environments
(depends on spring-core, spring-beans, spring-context)
Define this if you use Spring MVC, or wish to use Struts, JSF, or another web framework with Spring (org.springframework.web.*)
-->
<dependency>
<groupId>org.springframework</groupId>
<artifactId>spring-web</artifactId>
<version>${org.springframework.version}</version>
</dependency>
<!--
Spring MVC for Servlet Environments (depends on spring-core, spring-beans, spring-context, spring-web)
Define this if you use Spring MVC with a Servlet Container such as Apache Tomcat (org.springframework.web.servlet.*)
-->
<dependency>
<groupId>org.springframework</groupId>
<artifactId>spring-webmvc</artifactId>
<version>${org.springframework.version}</version>
</dependency>
<!--
Spring MVC for Portlet Environments (depends on spring-core, spring-beans, spring-context, spring-web)
Define this if you use Spring MVC with a Portlet Container (org.springframework.web.portlet.*)
-->
<dependency>
<groupId>org.springframework</groupId>
<artifactId>spring-webmvc-portlet</artifactId>
<version>${org.springframework.version}</version>
</dependency>
<!--
Support for testing Spring applications with tools such as JUnit and TestNG
This artifact is generally always defined with a 'test' scope for the integration testing framework and unit testing stubs
-->
<dependency>
<groupId>org.springframework</groupId>
<artifactId>spring-test</artifactId>
<version>${org.springframework.version}</version>
<scope>test</scope>
</dependency>
<!--
Utilidad para trabajar de forma transparente con los servicios de spring en GWT
Esta utilidad la tuvimos que instalar manualmente en el repositorio de maven
mvn install:install-file -Dfile=spring4gwt-0.0.1.jar -DgroupId=code.google.com -DartifactId=spring4gwt -Dversion=0.0.1 -Dpackaging=jar -DgeneratePom=true
-->
<dependency>
<groupId>code.google.com</groupId>
<artifactId>spring4gwt</artifactId>
<version>0.0.1</version>
<scope>compile</scope>
</dependency>
<dependency>
<groupId>log4j</groupId>
<artifactId>log4j</artifactId>
<version>1.2.16</version>
<scope>compile</scope>
</dependency>
<!-- Oracle driver -->
<dependency>
<groupId>com.oracle.driver</groupId>
<artifactId>ojdbc14</artifactId>
<version>14</version>
</dependency>
<!-- Hibernate 3 -->
<dependency>
<groupId>org.hibernate.javax.persistence</groupId>
<artifactId>hibernate-jpa-2.0-api</artifactId>
<version>1.0.1.Final</version>
</dependency>
<dependency>
<groupId>org.hibernate</groupId>
<artifactId>hibernate-core</artifactId>
<version>3.5.2-Final</version>
</dependency>
<dependency>
<groupId>org.hibernate</groupId>
<artifactId>hibernate-entitymanager</artifactId>
<version>3.5.2-Final</version>
</dependency>
<!-- <dependency> -->
<!-- <groupId>org.hibernate</groupId> -->
<!-- <artifactId>hibernate-validator</artifactId> -->
<!-- <version>4.2.0.Final</version> -->
<!-- </dependency> -->
<!-- Necesario para Hibernate, ya que pide una clase cuando inicializa la app y sino la tiene pincha.
Es por eso que se tiene q bajar esta dependencia extra a SLF4J -->
<dependency>
<groupId>org.slf4j</groupId>
<artifactId>slf4j-log4j12</artifactId>
<version>1.5.8</version>
</dependency>
<!-- Necesario para algunas anotaciones como el @PostConstruct -->
<!-- <dependency> -->
<!-- <groupId>javaee</groupId> -->
<!-- <artifactId>javaee-api</artifactId> -->
<!-- <version>5</version> -->
<!-- </dependency> -->
</dependencies>
<build>
<!-- Generate compiled stuff in the folder used for developing mode
To be even more productive you should also configure the build.outputDirectory to ouput classes into /war/WEB-INF/classes
so that any change to a java source in your favourite IDE is immediatelly usable in the hosted browser with a simple refresh.-->
<!-- A la hora de importar el proyecto, vemos que dentro del java build path/source/default output classes/ vamos a tener esto:
"MyGwtMavenSampleApp/target/MyGwtMavenSampleApp-1.0-SNAPSHOT/WEB-INF/classes" -->
<!--outputDirectory>target/www/WEB-INF/classes</outputDirectory-->
<outputDirectory>${project.build.directory}/${project.build.finalName}/WEB-INF/classes</outputDirectory>
<plugins>
<!-- GWT Maven Plugin-->
<plugin>
<groupId>org.codehaus.mojo</groupId>
<artifactId>gwt-maven-plugin</artifactId>
<dependencies>
<!-- En caso que se utilice una version de ls SDK de GWT diferente a la que soporta este plugin (2.4.0)
agregamos estas dos dependencias -->
<dependency>
<groupId>com.google.gwt</groupId>
<artifactId>gwt-user</artifactId>
<version>${gwtVersion}</version>
</dependency>
<dependency>
<groupId>com.google.gwt</groupId>
<artifactId>gwt-dev</artifactId>
<version>${gwtVersion}</version>
</dependency>
</dependencies>
<!-- JS is only needed in the package phase, this speeds up testing -->
<!-- Esto ejecutara la compilarcion de JavaScript solo a partir de la fase de prepare-package en adelante (mvn package o install) o
bien, ejecutando de el mvn gwt:compile (pero este ultimo no te compilara las clases, solo te compilara a JS)
Por eso es recomendabel tirar los dos compandos mvn compile gwt:compile o bien tirar directamente mvn package-->
<executions>
<execution>
<phase>prepare-package</phase>
<goals>
<goal>compile</goal>
<!--goal>generateAsync</goal-->
<!--goal>test</goal-->
</goals>
</execution>
</executions>
<!-- Plugin configuration. There are many available options, see gwt-maven-plugin documentation at codehaus.org -->
<configuration>
<!-- URL that should be automatically opened in the GWT shell (gwt:run). -->
<runTarget>MyGwtMavenSampleApp.html</runTarget>
<!-- Location of the develop-mode web application structure (gwt:run). -->
<!--hostedWebapp>target/www</hostedWebapp-->
<hostedWebapp>${project.build.directory}/${project.build.finalName}</hostedWebapp>
<!-- Ask GWT to create the Story of Your Compile (SOYC) (gwt:compile) -->
<soyc>true</soyc>
</configuration>
</plugin>
<!-- Copy static web files before executing gwt:run
Este se ejecutara cuando se corra el comando mvn compile o mvn package o mvn install. Esto te permite agregar al www los recursos
estaticos como ser css y html. -->
<plugin>
<artifactId>maven-resources-plugin</artifactId>
<executions>
<execution>
<phase>compile</phase>
<goals>
<goal>copy-resources</goal>
</goals>
<configuration>
<!--outputDirectory>target/www</outputDirectory-->
<outputDirectory> ${project.build.directory}/${project.build.finalName}</outputDirectory>
<resources>
<resource>
<directory>src/main/webapp</directory>
</resource>
</resources>
</configuration>
</execution>
</executions>
</plugin>
<!-- Mark the project for Google Plugin for Eclipse (GPE)
The Eclipse Plugin is used to generate Eclipse IDE files (*.classpath, *.wtpmodules and the .settings folder)
for use with a project. -->
<plugin>
<artifactId>maven-eclipse-plugin</artifactId>
<version>2.8</version>
<configuration>
<downloadSources>true</downloadSources>
<downloadJavadocs>true</downloadJavadocs>
<wtpversion>2.0</wtpversion>
</configuration>
</plugin>
</plugins>
</build>
</project>
Una vez descargado el proyecto que integra GWT + Spring + Jpa + Hibernate + Maven
Verificamos que sea la correcta versión de Maven y la JDK 1.5

Luego , vamos a generar los siguientes comando de maven para compilar el proyecto, generar los archivos para poder importarlo en el eclipse, y generar el war:

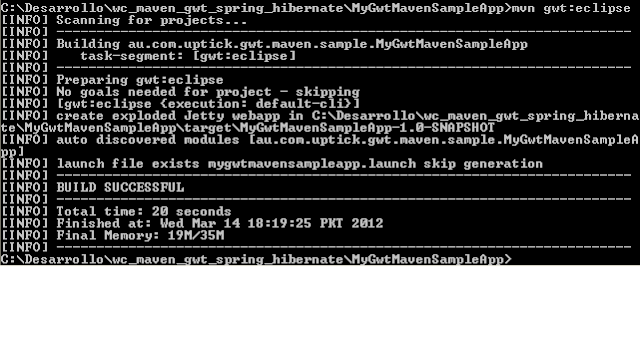

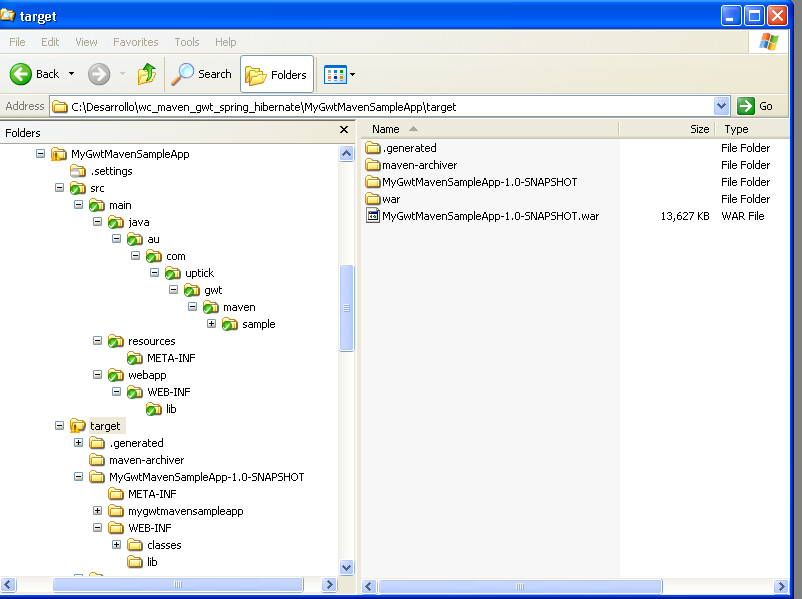
Vemos que esto lo esta arrojando en /tarjet/MyGwtMavenSampleApp-1.0-SNAPSHOT segun lo definido en el POM
...
<outputDirectory>${project.build.directory}/${project.build.finalName}/WEB-INF/classes</outputDirectory>
...


IMPORTANTE: Al arrojar mvn package o mvn install, siempre nos tendremos que asegurar que se ejecute la compilacion de JavaScript aportado por el plugin de mojo.Ver en la captura que aparece algo que dice compiling 5 permitations...


Para correr la aplicación vamos a ejecutar el archivo: MyGwtMavenSampleApp.launch (este nos arroja un error que lo solucionamos copiando los JARs a WEB-INF/lib mediante el siguiente comando:
mvn dependency:copy-dependencies
y deberiamos agregar esto al POM.xml
<!-- Copia las librerias al WEB-INF/lib -->
<!-- mvn dependency:copy-dependencies -->
<!-- Esto viene a colacion de un error que lanzaba a la hora de desplegar la app
que decia que estaba mal el applicationContext ya que no encontraba las librerias de TX -->
<plugin>
<groupId>org.apache.maven.plugins</groupId>
<artifactId>maven-dependency-plugin</artifactId>
<version>2.1</version>
<configuration>
<outputDirectory>${webInfLibPath}</outputDirectory>
<excludeGroupIds>${pom.groupId}</excludeGroupIds>
<excludeScope>provided</excludeScope>
</configuration>
</plugin>
En caso que querramos que Eclipse tenga integracion con GWT (en este ejemplo, utilizamos esta alternativa) nos tendremos que descargar el plugin
Luego vamos a tener que activar este plugin para el proyecto existente de GWT + Maven (creado anteriormente mediante el webAppCreator):
Ver: http://www.uptick.com.au/content/getting-started-gwt-maven-and-eclipse
Ver: http://googlewebtoolkit.blogspot.com/2010/08/how-to-use-google-plugin-for-eclipse.html

Esto generara todo el esqueleto, donde luego vamos a tener que importarlo al ecilpse como un proyecto maven existente. Nos quedara de la siguiente forma:


Luego lanzamos la aplicacion haciendo clic derecho sobre el proyecto => run as => web applicaton y la primera vez vamos a tener q seleccionar el proyecto compilardo)

Y listo!.
Luego podemos generar el WAR mediante el mvn clean install
y luego podemos deployarlo directamente en el TOMCAT:
Antes que anda le cambiamos el puerto donde escuachara en tomcat/conf/server.xml
....
....
<!-- Define a non-SSL HTTP/1.1 Connector on port 8080 -->
<Connector port="8081" maxHttpHeaderSize="8192"
maxThreads="150" minSpareThreads="25" maxSpareThreads="75"
enableLookups="false" redirectPort="8443" acceptCount="100"
connectionTimeout="20000" disableUploadTimeout="true" />
<!-- Note : To disable connection timeouts, set connectionTimeout value
....
....
Luego agregamos dos nuevos roles y un nuevo usuario que tenga dichos roles para poder entrar a la parte de la adminstracion para deployar.
Para esto vamos a tomcat/conf/tomcat-users.xml
<?xml version='1.0' encoding='utf-8'?>
<tomcat-users>
<role rolename="tomcat"/>
<role rolename="role1"/>
<role rolename="manager"/>
<role rolename="admin"/>
<user username="tomcat" password="tomcat" roles="tomcat"/>
<user username="both" password="tomcat" roles="tomcat,role1"/>
<user username="role1" password="tomcat" roles="role1"/>
<user username="admin" password="admin" roles="manager,admin"/>
</tomcat-users>
y luego iniciamos el tomcat y entramos al manager:

Vemos que la app quedo deployada sin problemas. Hacemos clic sobre al app y se nos abrira un browser con la app.
Espero que se haya entendido.
-DarchetypeArtifactId=gwt-maven-plugin
-DarchetypeVersion=2.1.1-SNAPSHOT
-DgroupId=au.com.uptick
-DartifactId=MyGwtMavenSampleApp
-Dversion=0.0.1-SNAPSHOT
-Dpackage=au.com.uptick.gwt.maven.sample
-Dmodule=MyGwtMavenSampleApp
Alternativa 3 para generar un proyecto esqueleto con GWT y Maven :
Una forma que no trajo demasiado dolores de cabeza a la hora de crear un projecto GWT con Maven es mediante el webAppCreator que viene al bajarnos la SDK de GWT del sitio oficial.
Para esto vamos a usar la versión 2.1.1 de gwt que es compatible con la JDK 1.5 y maven 2.
Para esto, nos situamos dentro de la SDK de GWT que nos descargamos desde el sitio de google y ejecutamos el siguietne comando:
webAppCreator -maven -out MyGwtMavenSampleApp au.com.uptick.gwt.maven.sample.MyGwtMavenSampleApp
Si miramos el POM que se genera, vemos que tenemos un PLUGIN de gwt para maven llamado MOJO (http://mojo.codehaus.org/gwt-maven-plugin/):
<!-- GWT Maven Plugin-->
<plugin>
<groupId>org.codehaus.mojo</groupId>
<artifactId>gwt-maven-plugin</artifactId>
<!-- JS is only needed in the package phase, this speeds up testing -->
<executions>
<execution>
<phase>prepare-package</phase>
<goals>
<goal>compile</goal>
</goals>
</execution>
</executions>
<!-- Plugin configuration. There are many available options,
see gwt-maven-plugin documentation at codehaus.org -->
<configuration>
<!-- URL that should be automatically opened in the GWT shell (gwt:run). -->
<runTarget>MyGwtMavenSampleApp.html</runTarget>
<!-- Location of the develop-mode web application structure (gwt:run). -->
<hostedWebapp>target/www</hostedWebapp>
<!-- Ask GWT to create the Story of Your Compile (SOYC) (gwt:compile) -->
<soyc>true</soyc>
</configuration>
</plugin>
ATENCION:
En caso que utilicemos una version inferior o distinta a la SDK 2.4 de GWT vamos a tener que indicarselo a dicho plugin ya que por defecto, viene para dicha version de GWT. Para esto, vamos a modificar la parte del plugin de MOJO del POM de la siguiente manera (como indica en esta parte del sitio de MOJO: http://mojo.codehaus.org/gwt-maven-plugin/user-guide/using-different-gwt-sdk-version.)
<!-- GWT Maven Plugin-->
<plugin>
<groupId>org.codehaus.mojo</groupId>
<artifactId>gwt-maven-plugin</artifactId>
<dependencies>
<dependency>
<groupId>com.google.gwt</groupId>
<artifactId>gwt-user</artifactId>
<version>${gwtVersion}</version>
</dependency>
<dependency>
<groupId>com.google.gwt</groupId>
<artifactId>gwt-dev</artifactId>
<version>${gwtVersion}</version>
</dependency>
</dependencies>
<!-- JS is only needed in the package phase, this speeds up testing -->
<executions>
<execution>
<phase>prepare-package</phase>
<goals>
<goal>compile</goal>
</goals>
</execution>
</executions>
<!-- Plugin configuration. There are many available options,
see gwt-maven-plugin documentation at codehaus.org -->
<configuration>
<!-- URL that should be automatically opened in the GWT shell (gwt:run). -->
<runTarget>MyGwtMavenSampleApp.html</runTarget>
<!-- Location of the develop-mode web application structure (gwt:run). -->
<hostedWebapp>target/www</hostedWebapp>
<!-- Ask GWT to create the Story of Your Compile (SOYC) (gwt:compile) -->
<soyc>true</soyc>
</configuration>
</plugin>
Continuamos con el ejemplo descargado, vamos a compilarlo, generar el WAR y configurarlo en el Eclipse
Si no descargamos todavía el proyecto, vamos a descargarlo desde aqui y seguir los siguientes pasos
EL POM, modificado con integración entre GWT, Spring, JPA y Hibernate seria el siguiente (es lo mismo que el descargado previamente):
<?xml version="1.0" encoding="UTF-8"?>
<project xmlns="http://maven.apache.org/POM/4.0.0" xmlns:xsi="http://www.w3.org/2001/XMLSchema-instance"
xsi:schemaLocation="http://maven.apache.org/POM/4.0.0 http://maven.apache.org/maven-v4_0_0.xsd">
<!-- POM file generated with GWT webAppCreator -->
<modelVersion>4.0.0</modelVersion>
<groupId>au.com.uptick.gwt.maven.sample</groupId>
<artifactId>MyGwtMavenSampleApp</artifactId>
<packaging>war</packaging>
<version>1.0-SNAPSHOT</version>
<name>au.com.uptick.gwt.maven.sample.MyGwtMavenSampleApp</name>
<!--
*************************************************
LEER:
*************************************************
http://mojo.codehaus.org/gwt-maven-plugin/eclipse/google_plugin.html
http://mojo.codehaus.org/gwt-maven-plugin/user-guide/project.html
*************************************************
mvn clean
mvn eclipse:clean
mvn gwt:eclipse
mvn compile gwt:compile
mvn package
mvn install
-->
<properties>
<!-- Convenience property to set the GWT version -->
<gwtVersion>2.1.1</gwtVersion>
<org.springframework.version>3.0.5.RELEASE</org.springframework.version>
<!-- GWT needs at least java 1.5 -->
<maven.compiler.source>1.5</maven.compiler.source>
<maven.compiler.target>1.5</maven.compiler.target>
</properties>
<dependencies>
<dependency>
<groupId>com.google.gwt</groupId>
<artifactId>gwt-servlet</artifactId>
<version>${gwtVersion}</version>
<scope>runtime</scope>
</dependency>
<dependency>
<groupId>com.google.gwt</groupId>
<artifactId>gwt-user</artifactId>
<version>${gwtVersion}</version>
<scope>provided</scope>
</dependency>
<dependency>
<groupId>com.google.gwt</groupId>
<artifactId>gwt-dev</artifactId>
<version>${gwtVersion}</version>
<scope>test</scope>
</dependency>
<dependency>
<groupId>junit</groupId>
<artifactId>junit</artifactId>
<version>4.4</version>
<scope>test</scope>
</dependency>
<!--
Core utilities used by other modules.
Define this if you use Spring Utility APIs (org.springframework.core.*/org.springframework.util.*)
-->
<dependency>
<groupId>org.springframework</groupId>
<artifactId>spring-core</artifactId>
<version>${org.springframework.version}</version>
</dependency>
<!--
Expression Language (depends on spring-core)
Define this if you use Spring Expression APIs (org.springframework.expression.*)
-->
<dependency>
<groupId>org.springframework</groupId>
<artifactId>spring-expression</artifactId>
<version>${org.springframework.version}</version>
</dependency>
<!--
Bean Factory and JavaBeans utilities (depends on spring-core)
Define this if you use Spring Bean APIs (org.springframework.beans.*)
-->
<dependency>
<groupId>org.springframework</groupId>
<artifactId>spring-beans</artifactId>
<version>${org.springframework.version}</version>
</dependency>
<!--
Aspect Oriented Programming (AOP) Framework (depends on spring-core, spring-beans)
Define this if you use Spring AOP APIs (org.springframework.aop.*)
-->
<dependency>
<groupId>org.springframework</groupId>
<artifactId>spring-aop</artifactId>
<version>${org.springframework.version}</version>
</dependency>
<!--
Application Context (depends on spring-core, spring-expression, spring-aop, spring-beans)
This is the central artifact for Spring's Dependency Injection Container and is generally always defined
-->
<dependency>
<groupId>org.springframework</groupId>
<artifactId>spring-context</artifactId>
<version>${org.springframework.version}</version>
</dependency>
<!--
Various Application Context utilities, including EhCache, JavaMail, Quartz, and Freemarker integration
Define this if you need any of these integrations
-->
<dependency>
<groupId>org.springframework</groupId>
<artifactId>spring-context-support</artifactId>
<version>${org.springframework.version}</version>
</dependency>
<!--
Transaction Management Abstraction (depends on spring-core, spring-beans, spring-aop, spring-context)
Define this if you use Spring Transactions or DAO Exception Hierarchy
(org.springframework.transaction.*/org.springframework.dao.*)
-->
<dependency>
<groupId>org.springframework</groupId>
<artifactId>spring-tx</artifactId>
<version>${org.springframework.version}</version>
</dependency>
<!--
JDBC Data Access Library (depends on spring-core, spring-beans, spring-context, spring-tx)
Define this if you use Spring's JdbcTemplate API (org.springframework.jdbc.*)
-->
<dependency>
<groupId>org.springframework</groupId>
<artifactId>spring-jdbc</artifactId>
<version>${org.springframework.version}</version>
</dependency>
<!--
Object-to-Relation-Mapping (ORM) integration with Hibernate, JPA, and iBatis.
(depends on spring-core, spring-beans, spring-context, spring-tx)
Define this if you need ORM (org.springframework.orm.*)
-->
<dependency>
<groupId>org.springframework</groupId>
<artifactId>spring-orm</artifactId>
<version>${org.springframework.version}</version>
</dependency>
<!--
Object-to-XML Mapping (OXM) abstraction and integration with JAXB, JiBX, Castor, XStream, and XML Beans.
(depends on spring-core, spring-beans, spring-context)
Define this if you need OXM (org.springframework.oxm.*)
-->
<dependency>
<groupId>org.springframework</groupId>
<artifactId>spring-oxm</artifactId>
<version>${org.springframework.version}</version>
</dependency>
<!--
Web application development utilities applicable to both Servlet and Portlet Environments
(depends on spring-core, spring-beans, spring-context)
Define this if you use Spring MVC, or wish to use Struts, JSF, or another web framework with Spring (org.springframework.web.*)
-->
<dependency>
<groupId>org.springframework</groupId>
<artifactId>spring-web</artifactId>
<version>${org.springframework.version}</version>
</dependency>
<!--
Spring MVC for Servlet Environments (depends on spring-core, spring-beans, spring-context, spring-web)
Define this if you use Spring MVC with a Servlet Container such as Apache Tomcat (org.springframework.web.servlet.*)
-->
<dependency>
<groupId>org.springframework</groupId>
<artifactId>spring-webmvc</artifactId>
<version>${org.springframework.version}</version>
</dependency>
<!--
Spring MVC for Portlet Environments (depends on spring-core, spring-beans, spring-context, spring-web)
Define this if you use Spring MVC with a Portlet Container (org.springframework.web.portlet.*)
-->
<dependency>
<groupId>org.springframework</groupId>
<artifactId>spring-webmvc-portlet</artifactId>
<version>${org.springframework.version}</version>
</dependency>
<!--
Support for testing Spring applications with tools such as JUnit and TestNG
This artifact is generally always defined with a 'test' scope for the integration testing framework and unit testing stubs
-->
<dependency>
<groupId>org.springframework</groupId>
<artifactId>spring-test</artifactId>
<version>${org.springframework.version}</version>
<scope>test</scope>
</dependency>
<!--
Utilidad para trabajar de forma transparente con los servicios de spring en GWT
Esta utilidad la tuvimos que instalar manualmente en el repositorio de maven
mvn install:install-file -Dfile=spring4gwt-0.0.1.jar -DgroupId=code.google.com -DartifactId=spring4gwt -Dversion=0.0.1 -Dpackaging=jar -DgeneratePom=true
-->
<dependency>
<groupId>code.google.com</groupId>
<artifactId>spring4gwt</artifactId>
<version>0.0.1</version>
<scope>compile</scope>
</dependency>
<dependency>
<groupId>log4j</groupId>
<artifactId>log4j</artifactId>
<version>1.2.16</version>
<scope>compile</scope>
</dependency>
<!-- Oracle driver -->
<dependency>
<groupId>com.oracle.driver</groupId>
<artifactId>ojdbc14</artifactId>
<version>14</version>
</dependency>
<!-- Hibernate 3 -->
<dependency>
<groupId>org.hibernate.javax.persistence</groupId>
<artifactId>hibernate-jpa-2.0-api</artifactId>
<version>1.0.1.Final</version>
</dependency>
<dependency>
<groupId>org.hibernate</groupId>
<artifactId>hibernate-core</artifactId>
<version>3.5.2-Final</version>
</dependency>
<dependency>
<groupId>org.hibernate</groupId>
<artifactId>hibernate-entitymanager</artifactId>
<version>3.5.2-Final</version>
</dependency>
<!-- <dependency> -->
<!-- <groupId>org.hibernate</groupId> -->
<!-- <artifactId>hibernate-validator</artifactId> -->
<!-- <version>4.2.0.Final</version> -->
<!-- </dependency> -->
<!-- Necesario para Hibernate, ya que pide una clase cuando inicializa la app y sino la tiene pincha.
Es por eso que se tiene q bajar esta dependencia extra a SLF4J -->
<dependency>
<groupId>org.slf4j</groupId>
<artifactId>slf4j-log4j12</artifactId>
<version>1.5.8</version>
</dependency>
<!-- Necesario para algunas anotaciones como el @PostConstruct -->
<!-- <dependency> -->
<!-- <groupId>javaee</groupId> -->
<!-- <artifactId>javaee-api</artifactId> -->
<!-- <version>5</version> -->
<!-- </dependency> -->
</dependencies>
<build>
<!-- Generate compiled stuff in the folder used for developing mode
To be even more productive you should also configure the build.outputDirectory to ouput classes into /war/WEB-INF/classes
so that any change to a java source in your favourite IDE is immediatelly usable in the hosted browser with a simple refresh.-->
<!-- A la hora de importar el proyecto, vemos que dentro del java build path/source/default output classes/ vamos a tener esto:
"MyGwtMavenSampleApp/target/MyGwtMavenSampleApp-1.0-SNAPSHOT/WEB-INF/classes" -->
<!--outputDirectory>target/www/WEB-INF/classes</outputDirectory-->
<outputDirectory>${project.build.directory}/${project.build.finalName}/WEB-INF/classes</outputDirectory>
<plugins>
<!-- GWT Maven Plugin-->
<plugin>
<groupId>org.codehaus.mojo</groupId>
<artifactId>gwt-maven-plugin</artifactId>
<dependencies>
<!-- En caso que se utilice una version de ls SDK de GWT diferente a la que soporta este plugin (2.4.0)
agregamos estas dos dependencias -->
<dependency>
<groupId>com.google.gwt</groupId>
<artifactId>gwt-user</artifactId>
<version>${gwtVersion}</version>
</dependency>
<dependency>
<groupId>com.google.gwt</groupId>
<artifactId>gwt-dev</artifactId>
<version>${gwtVersion}</version>
</dependency>
</dependencies>
<!-- JS is only needed in the package phase, this speeds up testing -->
<!-- Esto ejecutara la compilarcion de JavaScript solo a partir de la fase de prepare-package en adelante (mvn package o install) o
bien, ejecutando de el mvn gwt:compile (pero este ultimo no te compilara las clases, solo te compilara a JS)
Por eso es recomendabel tirar los dos compandos mvn compile gwt:compile o bien tirar directamente mvn package-->
<executions>
<execution>
<phase>prepare-package</phase>
<goals>
<goal>compile</goal>
<!--goal>generateAsync</goal-->
<!--goal>test</goal-->
</goals>
</execution>
</executions>
<!-- Plugin configuration. There are many available options, see gwt-maven-plugin documentation at codehaus.org -->
<configuration>
<!-- URL that should be automatically opened in the GWT shell (gwt:run). -->
<runTarget>MyGwtMavenSampleApp.html</runTarget>
<!-- Location of the develop-mode web application structure (gwt:run). -->
<!--hostedWebapp>target/www</hostedWebapp-->
<hostedWebapp>${project.build.directory}/${project.build.finalName}</hostedWebapp>
<!-- Ask GWT to create the Story of Your Compile (SOYC) (gwt:compile) -->
<soyc>true</soyc>
</configuration>
</plugin>
<!-- Copy static web files before executing gwt:run
Este se ejecutara cuando se corra el comando mvn compile o mvn package o mvn install. Esto te permite agregar al www los recursos
estaticos como ser css y html. -->
<plugin>
<artifactId>maven-resources-plugin</artifactId>
<executions>
<execution>
<phase>compile</phase>
<goals>
<goal>copy-resources</goal>
</goals>
<configuration>
<!--outputDirectory>target/www</outputDirectory-->
<outputDirectory> ${project.build.directory}/${project.build.finalName}</outputDirectory>
<resources>
<resource>
<directory>src/main/webapp</directory>
</resource>
</resources>
</configuration>
</execution>
</executions>
</plugin>
<!-- Mark the project for Google Plugin for Eclipse (GPE)
The Eclipse Plugin is used to generate Eclipse IDE files (*.classpath, *.wtpmodules and the .settings folder)
for use with a project. -->
<plugin>
<artifactId>maven-eclipse-plugin</artifactId>
<version>2.8</version>
<configuration>
<downloadSources>true</downloadSources>
<downloadJavadocs>true</downloadJavadocs>
<wtpversion>2.0</wtpversion>
</configuration>
</plugin>
</plugins>
</build>
</project>
Una vez descargado el proyecto que integra GWT + Spring + Jpa + Hibernate + Maven
Verificamos que sea la correcta versión de Maven y la JDK 1.5

Luego , vamos a generar los siguientes comando de maven para compilar el proyecto, generar los archivos para poder importarlo en el eclipse, y generar el war:


Vemos que esto lo esta arrojando en /tarjet/MyGwtMavenSampleApp-1.0-SNAPSHOT segun lo definido en el POM
...
<outputDirectory>${project.build.directory}/${project.build.finalName}/WEB-INF/classes</outputDirectory>
...


IMPORTANTE: Al arrojar mvn package o mvn install, siempre nos tendremos que asegurar que se ejecute la compilacion de JavaScript aportado por el plugin de mojo.Ver en la captura que aparece algo que dice compiling 5 permitations...

Para correr la aplicación vamos a ejecutar el archivo: MyGwtMavenSampleApp.launch (este nos arroja un error que lo solucionamos copiando los JARs a WEB-INF/lib mediante el siguiente comando:
mvn dependency:copy-dependencies
y deberiamos agregar esto al POM.xml
<!-- Copia las librerias al WEB-INF/lib -->
<!-- mvn dependency:copy-dependencies -->
<!-- Esto viene a colacion de un error que lanzaba a la hora de desplegar la app
que decia que estaba mal el applicationContext ya que no encontraba las librerias de TX -->
<plugin>
<groupId>org.apache.maven.plugins</groupId>
<artifactId>maven-dependency-plugin</artifactId>
<version>2.1</version>
<configuration>
<outputDirectory>${webInfLibPath}</outputDirectory>
<excludeGroupIds>${pom.groupId}</excludeGroupIds>
<excludeScope>provided</excludeScope>
</configuration>
</plugin>
En caso que querramos que Eclipse tenga integracion con GWT (en este ejemplo, utilizamos esta alternativa) nos tendremos que descargar el plugin
Luego vamos a tener que activar este plugin para el proyecto existente de GWT + Maven (creado anteriormente mediante el webAppCreator):
- If you have an existing Maven project in Eclipse and want to enable GPE functionality, follow these steps:
- In Eclipse, open your project's properties (Alt+Enter or right-click, Properties)
- Under Google | App Engine, select the version of the App Engine SDK you're using. GPE is not yet able to use the version defined in your Maven POM, so you may need to download your SDK version using the Eclipse software updater (see http://code.google.com/eclipse/docs/download.html)
- Under Google | Web Toolkit, likewise select the version of the GWT SDK you're using. As with the App Engine SDK, install it via the Eclipse plugin update site if needed.
- Under Google | Web Application, check the "This project has a WAR directory" box and point it to your project's src/main/webapp directory. This is the standard WAR source folder for Maven Web projects. Be sure that the "Launch and deploy from this directory" box is NOT checked.
- Under Java Build Path, select the Order and Export tab and move all Maven dependencies to the BOTTOM. Otherwise, GPE will see the App Engine and GWT SDKs from the Maven repo on the build path and complain that they are not valid. This is because GPE expects a specific SDK structure used to enable other tooling. Asegurase que en la pestaña “Order and Export” la entrada Maven Dependencies este hasta abajo, de lo contrario te aparecerá un error diciendo “The project … does not have any GWT SDKs on its build path”
- Also under Java Build Path, select the Source tab and ensure that the Build output directory is enabled and pointing to target/your-project-name/WEB-INF/classes. If you created the project with mvn eclipse:eclipse, this should be done for you automatically.
- Finally, and this is very important, the first time you launch your project using Run As | Web Application (or Debug), you will be prompted to select the war directly. This is NOT src/main/webapp, but rather the WAR output folder, which is target/your-project-name. If you make a mistake, simply go to Run | Run Configurations... and remove any old configurations for the project. GPE will then ask you again next time you try to Run As | Web Application.
- Listo, ahora puedes lanzar tu aplicación medainte el plugin del eclipse dando clic derecho en tu proyecto y seleccionando “Debug As -> Web Application”, la primera vez te pedira que selecciones un directorio, asegurate de que sea el directorio “target/www/”. Cuando carga la aplicación en el navegador me muestra el error: “No source code is available for type com.google.gwt.junit.client.GWTTestCase” pero la aplicación funciona correctamente. Esto mismo me pasa cuando le doy “GWT compile” aunque quite el módulo RimelJUnit.xml de la configuración.
- Otro error que me tiro cuando armaba el WAR es el siguiente: module may need to be (re)compiled para lo cual encontre la solucion en este link: http://cirovladimir.wordpress.com/tag/gwt-module-may-need-to-be-recompiled/ El tema era que me estaba generando codigo en src/main/webapps que no me deberia generar. Borre la carpeta creada y listo!!
Ver: http://www.uptick.com.au/content/getting-started-gwt-maven-and-eclipse
Ver: http://googlewebtoolkit.blogspot.com/2010/08/how-to-use-google-plugin-for-eclipse.html

Esto generara todo el esqueleto, donde luego vamos a tener que importarlo al ecilpse como un proyecto maven existente. Nos quedara de la siguiente forma:


Luego lanzamos la aplicacion haciendo clic derecho sobre el proyecto => run as => web applicaton y la primera vez vamos a tener q seleccionar el proyecto compilardo)

Y listo!.
Luego podemos generar el WAR mediante el mvn clean install
y luego podemos deployarlo directamente en el TOMCAT:
Antes que anda le cambiamos el puerto donde escuachara en tomcat/conf/server.xml
....
....
<!-- Define a non-SSL HTTP/1.1 Connector on port 8080 -->
<Connector port="8081" maxHttpHeaderSize="8192"
maxThreads="150" minSpareThreads="25" maxSpareThreads="75"
enableLookups="false" redirectPort="8443" acceptCount="100"
connectionTimeout="20000" disableUploadTimeout="true" />
<!-- Note : To disable connection timeouts, set connectionTimeout value
....
....
Luego agregamos dos nuevos roles y un nuevo usuario que tenga dichos roles para poder entrar a la parte de la adminstracion para deployar.
Para esto vamos a tomcat/conf/tomcat-users.xml
<?xml version='1.0' encoding='utf-8'?>
<tomcat-users>
<role rolename="tomcat"/>
<role rolename="role1"/>
<role rolename="manager"/>
<role rolename="admin"/>
<user username="tomcat" password="tomcat" roles="tomcat"/>
<user username="both" password="tomcat" roles="tomcat,role1"/>
<user username="role1" password="tomcat" roles="role1"/>
<user username="admin" password="admin" roles="manager,admin"/>
</tomcat-users>
y luego iniciamos el tomcat y entramos al manager:

Vemos que la app quedo deployada sin problemas. Hacemos clic sobre al app y se nos abrira un browser con la app.
Espero que se haya entendido.